
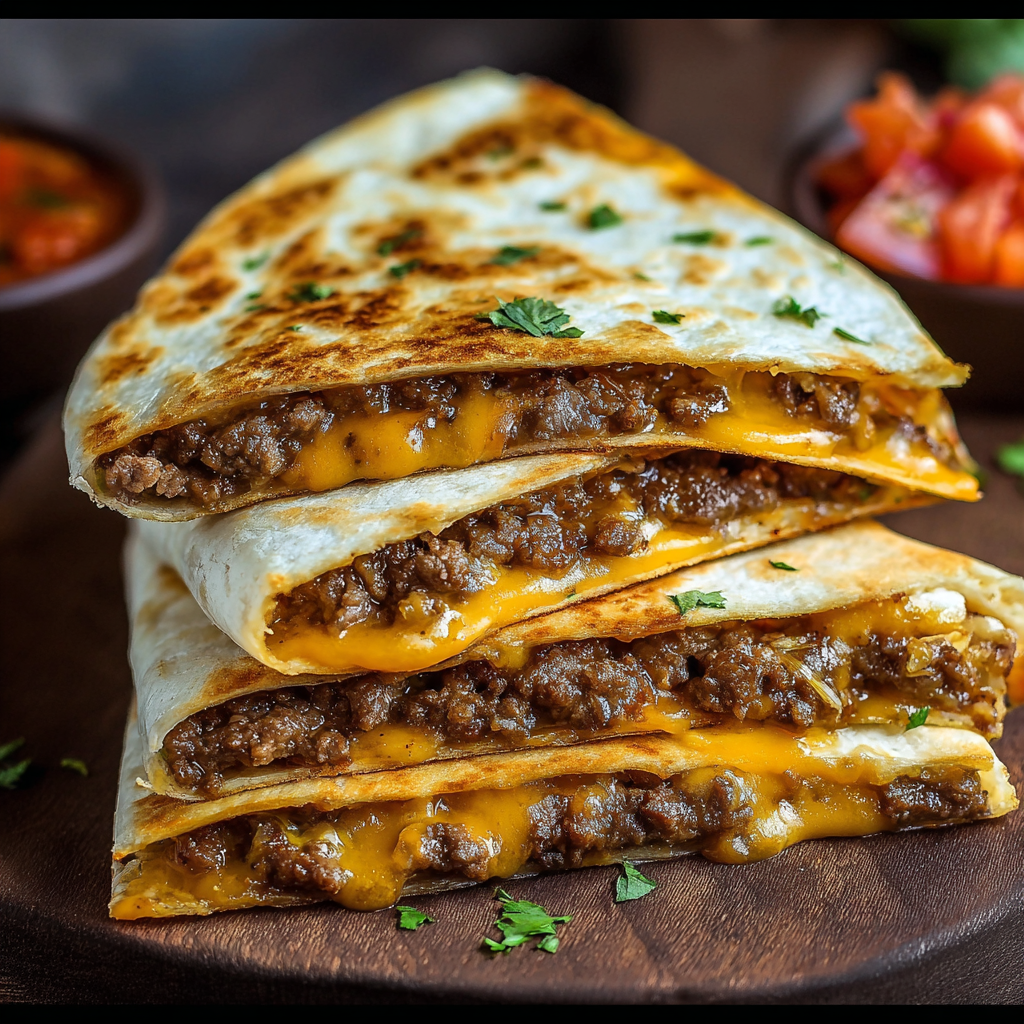
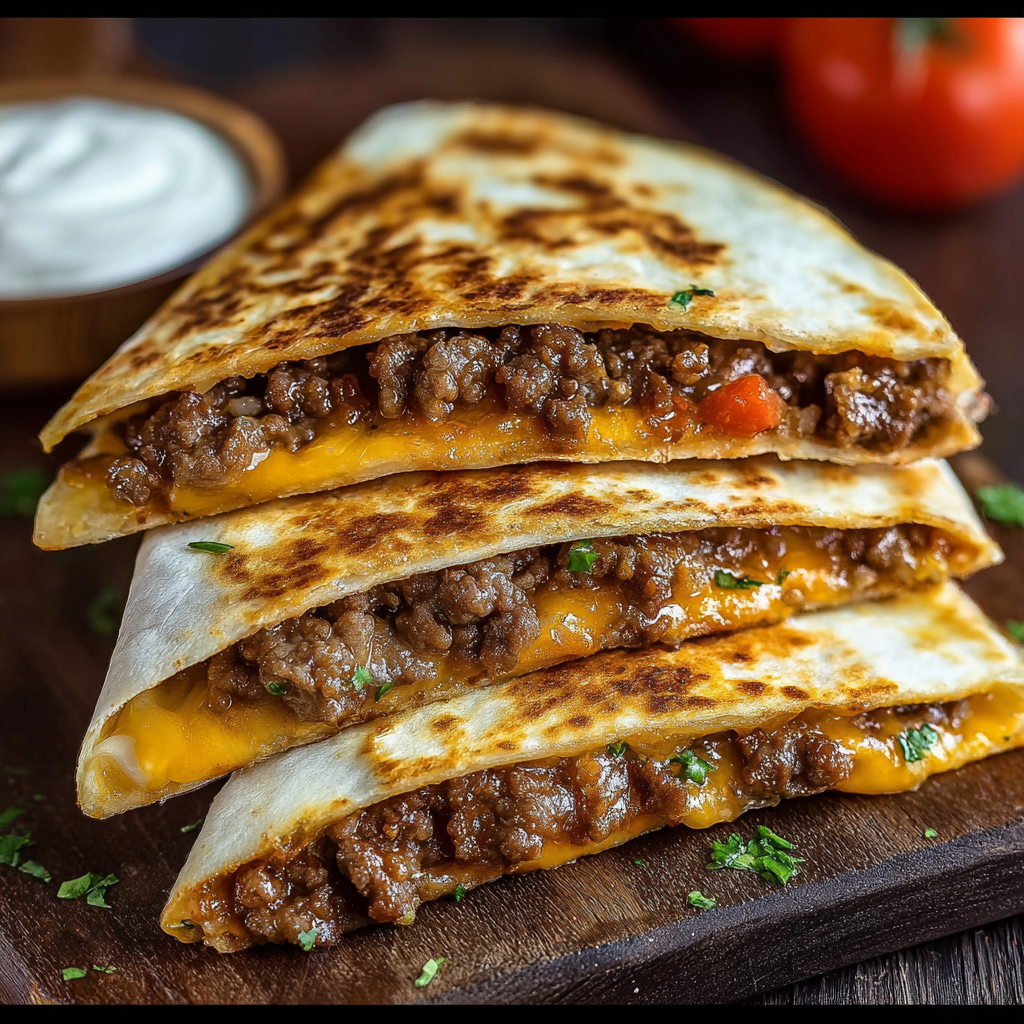
Smashburger Quesadillas

A playful mashup of burger and quesadilla: seasoned smashed beef pressed into a tortilla with melty cheese and optional burger-style toppings. Fast, fun, and addictive.
This recipe brings back the fun of burger night with a bold, melty twist. I stumbled on this idea during a late-night craving when I wanted the joy of a juicy burger but only had tortillas and a little ground beef in the fridge. The result felt like a secret between supper and snack time: beef seasoned and smashed thin right onto a warm tortilla, layered with gooey cheese, folded, and griddled until the edges sing with crispness. It's casual, fast, and exactly the sort of food that makes people smile the moment they take a bite.
What makes this mashup special is the contrast of textures and flavors. The smashed beef develops caramelized bits where it hits the hot pan, giving you that charred, slightly crispy edge you expect from a fast-food patty. The melted cheese glues everything together, while optional burger accoutrements—dill pickles, diced raw onion, or a swipe of burger sauce—bring familiar brightness and tang. I often make these when friends come over for a game or when I want to turn a tired weeknight into something celebratory without a lot of fuss.
Why You'll Love This Recipe
- It turns pantry staples into something irresistible—ready in about 20 minutes, perfect for busy weeknights or last-minute guests.
- Each portion is customizable: add pickles and sauce for a classic burger vibe or keep it simple with cheese for kid-approved comfort.
- The technique uses one skillet or griddle and minimal cleanup, because the beef cooks directly on the tortilla and everything gets folded into one handheld parcel.
- It’s budget-friendly: 1 pound of ground beef stretches into four generous servings when paired with tortillas and cheese.
- Make-ahead friendly—cooked quesadillas reheat beautifully in a skillet or oven, and you can prep toppings in advance for faster assembly.
- Great for crowd-pleasing: double the batch for parties or cut into wedges for easy sharing.
On my first attempt I served these to my partner and two friends during a movie night. The room went quiet with every bite—then erupted into requests for the recipe. Over time I've refined how much beef to press, the best cheese to use, and how a quick swipe of burger sauce lifts the whole thing. These moments are exactly why I love simple recipes that still feel indulgent.
Ingredients
- Ground beef (1 lb): Use 80/20 for the best balance of flavor and juiciness—leaner mixes dry out when smashed; grass-fed varieties provide a beefier note. Buy fresh or use good-quality store-brand ground beef if you’re on a budget.
- Salt, freshly ground black pepper, garlic powder: Season generously; salt enhances browning and flavor, pepper adds bite, and garlic powder gives a subtle savory backbone without moisture.
- Large flour tortillas (4): Choose pliable, medium-thin tortillas (10–12 inches) so they fold easily and crisp up without becoming too thick.
- Shredded cheese (1 cup): Cheddar or American melt beautifully—use pre-shredded blends for convenience, but freshly shredded cheese melts a touch better.
- Optional toppings: Dill pickles, diced onion, and burger sauce (or ketchup + mayo + a dash of mustard) add classic burger brightness; substitute with sliced jalapeños or avocado for a different profile.
Instructions
Preheat your cooking surface:Heat a large skillet or griddle over medium-high heat until it’s hot but not smoking—about 375°F on a cast-iron surface. A properly heated pan ensures instant searing when the beef hits the tortilla, which is key to forming those desirable browned bits in 2–3 minutes.Portion the beef:Divide the 1 pound of ground beef into four even handfuls (about 4 ounces each). Keep the portions loosely packed; you want air and irregularity so the meat flattens quickly and develops texture when pressed.Assemble and smash:Lay a tortilla flat, place a handful of beef on one half, season with salt, pepper, and a light dusting of garlic powder. Press the meat down thinly and evenly with a spatula or small flat press. The goal is a thin patty that covers half the tortilla—this shortens cook time and maximizes crisp contact with the pan.Cook the beef side:Place the tortilla beef-side down into the hot skillet. Cook undisturbed for 2–3 minutes until the edges of the beef darken and the aroma becomes nutty. Watch closely—thin beef will brown quickly and can go from perfect to overcooked fast.Flip, add cheese, and fold:Flip the tortilla so the beef now faces up. Immediately sprinkle cheese over the cooked beef and fold the empty tortilla half over to create a semicircle. Gently press with the spatula to help the cheese melt and the two layers adhere.Finish and crisp:Cook the folded quesadilla for 1–2 minutes per side, flipping once, until both sides are golden brown and crisp and the cheese is fully melted. If the exterior is browning too fast before the cheese melts, lower the heat slightly and cover the pan briefly to trap heat.Rest and slice:Transfer to a cutting board and let rest 1 minute—this helps the cheese set slightly so slices hold together. Cut into wedges and serve immediately with pickles, diced onion, or burger sauce on the side.
You Must Know
- Leftovers keep well refrigerated in an airtight container for up to 3 days; re-crisp in a skillet or toaster oven rather than the microwave to preserve texture.
- High in protein and fat—about 450 calories and 30 g fat per serving—this is a satisfying, indulgent handheld rather than a light snack.
- Freezing fully cooked quesadillas is possible for up to 2 months; reheat from frozen in a 350°F oven for 12–15 minutes, flipping halfway through.
- Swap tortillas for low-carb wraps or large lettuce leaves for a lighter option, though texture will differ.
My favorite part of this mashup is how quickly it brings people together—hands reach across the table, and in minutes the mood changes. I’ve served these at casual gatherings and late-night game parties; they never last long. The recipe teaches a simple truth: a few well-timed moments on a hot pan transform basic ingredients into something memorable.
Storage Tips
Store cooled quesadillas in a single layer separated by parchment or wax paper inside an airtight container in the refrigerator for up to 3 days. For longer storage, wrap each folded quesadilla individually in plastic wrap and place in a freezer bag; they’ll keep up to 2 months. To reheat, preheat a skillet over medium and warm each side until the exterior crisps and the interior is hot—this restores texture far better than microwaving. For oven reheating, set the oven to 350°F and heat for 8–12 minutes, flipping halfway.
Ingredient Substitutions
If you prefer a leaner version, use 90/10 ground beef but add a teaspoon of butter to the pan when cooking to encourage browning. Substitute ground turkey or chicken for a milder flavor—add a little olive oil to compensate for lower fat. For vegetarian options, brown finely chopped mushrooms or seasoned crumbled tempeh with a splash of soy sauce. Swap cheddar for Monterey Jack or pepper jack for a spicier kick; American cheese yields the creamiest melt.
Serving Suggestions
Cut each folded quesadilla into thirds and serve on a wooden board for an informal spread. Offer small bowls of burger sauce, ketchup, mustard, and pickles so guests customize each wedge. Pair with crisp fries, coleslaw, or a simple side salad dressed in a tangy vinaigrette to balance richness. For a brunch twist, serve alongside fried eggs or top open-faced with a sunny-side-up egg for extra indulgence.
Cultural Background
This mashup blends American diner and Tex-Mex influences: the smashed beef technique echoes fast-casual burger counters where patties are pressed thin for maximum sear, while the tortilla and melting cheese are classic elements of Mexican-American cuisine. The combination is a modern comfort-food hybrid, reflecting how home cooks borrow techniques across traditions to create approachable, craveable dishes.
Seasonal Adaptations
Spring and summer: add fresh sliced tomato or quick-pickled red onions for brightness. Fall and winter: swap in sharper aged cheddar and add a smear of caramelized onion jam to deepen flavor. For holiday gatherings, make a batch of smaller sliders by using 6-inch tortillas and offer a board with an array of topping choices to suit different tastes and dietary needs.
Meal Prep Tips
Prep toppings and shredded cheese in advance and store in airtight containers for up to 3 days. Portion the beef and keep it refrigerated until you’re ready to assemble for faster assembly during the week. If making a large batch, cook in batches and keep warmed in a 200°F oven on a wire rack so they stay crisp until serving. Label freezer-wrapped quesadillas with the date to rotate older items first.
Smashburger Quesadillas are a reminder that playful innovation in the kitchen doesn’t have to be complicated. With minimal ingredients and a little technique, you can create a crowd-pleasing, nostalgic meal that’s fast to make and fun to eat. Grab a skillet, some tortillas, and your favorite cheese—then get ready to smash and savor.
Pro Tips
Press the meat thin and evenly; thin patties brown faster and develop more crispy edges.
Use freshly shredded cheese for the best melt—pre-shredded cheese contains anti-caking agents that can affect texture.
If the exterior browns before the cheese melts, lower the heat and cover the pan for 30–60 seconds to trap heat.
This nourishing smashburger quesadillas recipe is sure to be a staple in your kitchen. Enjoy every moist, high protein slice — it is perfect for breakfast or as a wholesome snack any time.
FAQs about Recipes
Can I reheat leftover quesadillas?
Yes. To reheat, crisp in a skillet over medium heat for a few minutes per side until heated through, or reheat in a 350°F oven for 8–12 minutes.
What type of ground beef is best?
Use 80/20 ground beef for the best balance. If using leaner beef, add a little oil or butter for browning.
Tags
Smashburger Quesadillas
This Smashburger Quesadillas recipe makes perfectly juicy, tender, and flavorful steak every time! Serve with potatoes and a side salad for an unforgettable dinner in under 30 minutes.
Ingredients
Main
Seasoning
Optional toppings
Instructions
Preheat cooking surface
Heat a large skillet or griddle over medium-high heat until hot (about 375°F on cast iron). A hot surface ensures good browning of the meat.
Portion the beef
Divide the pound of ground beef into four even portions (about 4 ounces each), keeping them loosely packed so they flatten and develop texture when pressed.
Assemble and press
Place a portion of beef on one half of a tortilla, season with salt, pepper, and garlic powder, then press thinly and evenly with a spatula.
Cook beef side down
Put the tortilla beef-side down into the hot skillet and cook undisturbed for 2–3 minutes until edges brown and caramelize.
Flip, add cheese, fold
Flip the tortilla, sprinkle cheese over the cooked beef, fold the empty side over, and press slightly to encourage melting.
Finish and serve
Cook 1–2 minutes per side until both sides are golden and cheese is melted. Rest 1 minute, slice into wedges, and serve with pickles, diced onion, or sauce.
Last Step: Please leave a rating and comment letting us know how you liked this recipe! This helps our business to thrive and continue providing free, high-quality recipes for you.
Nutrition
Did You Make This?
Leave a comment & rating below or tag
@royalrecipe on social media!
Categories:
You might also like...
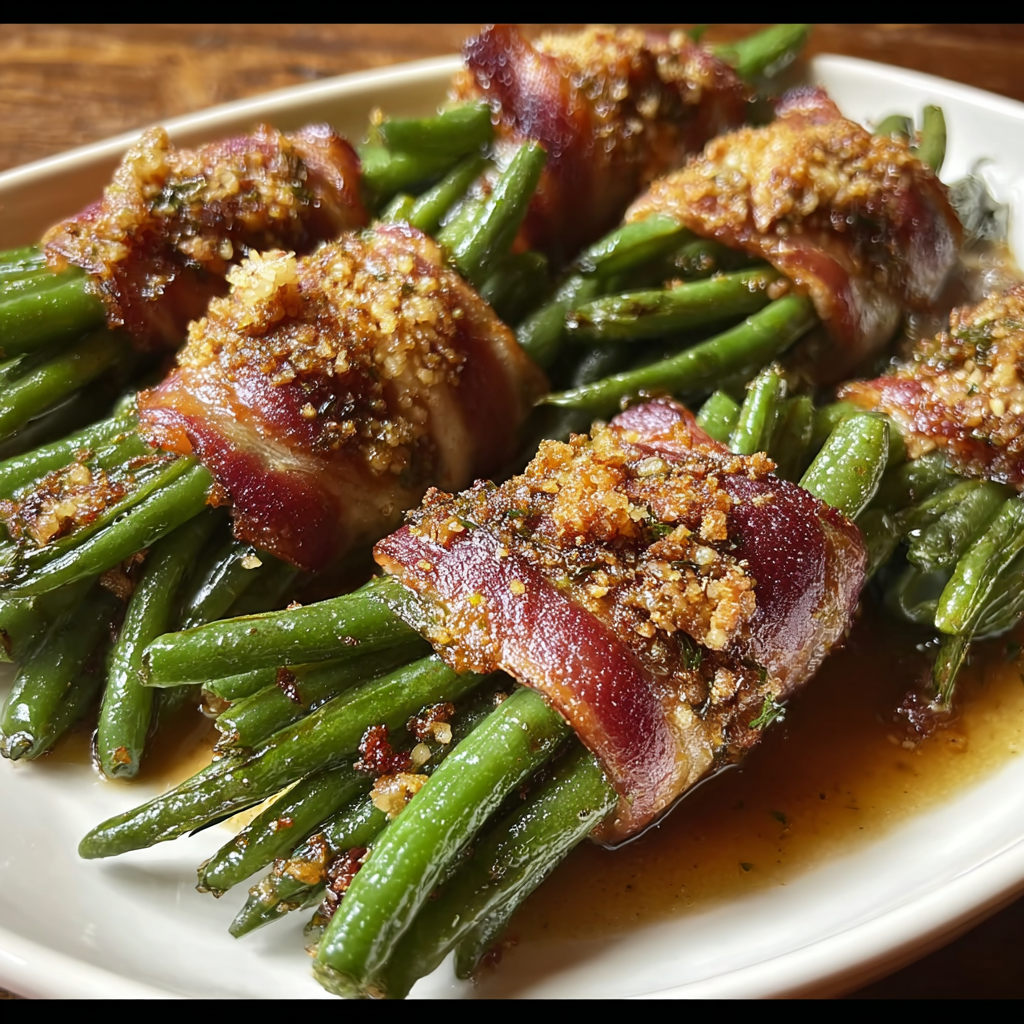
Green Bean Bundles
Bacon-wrapped green beans glazed with brown sugar and garlic — an elegant, low-carb side perfect for holidays and special dinners.
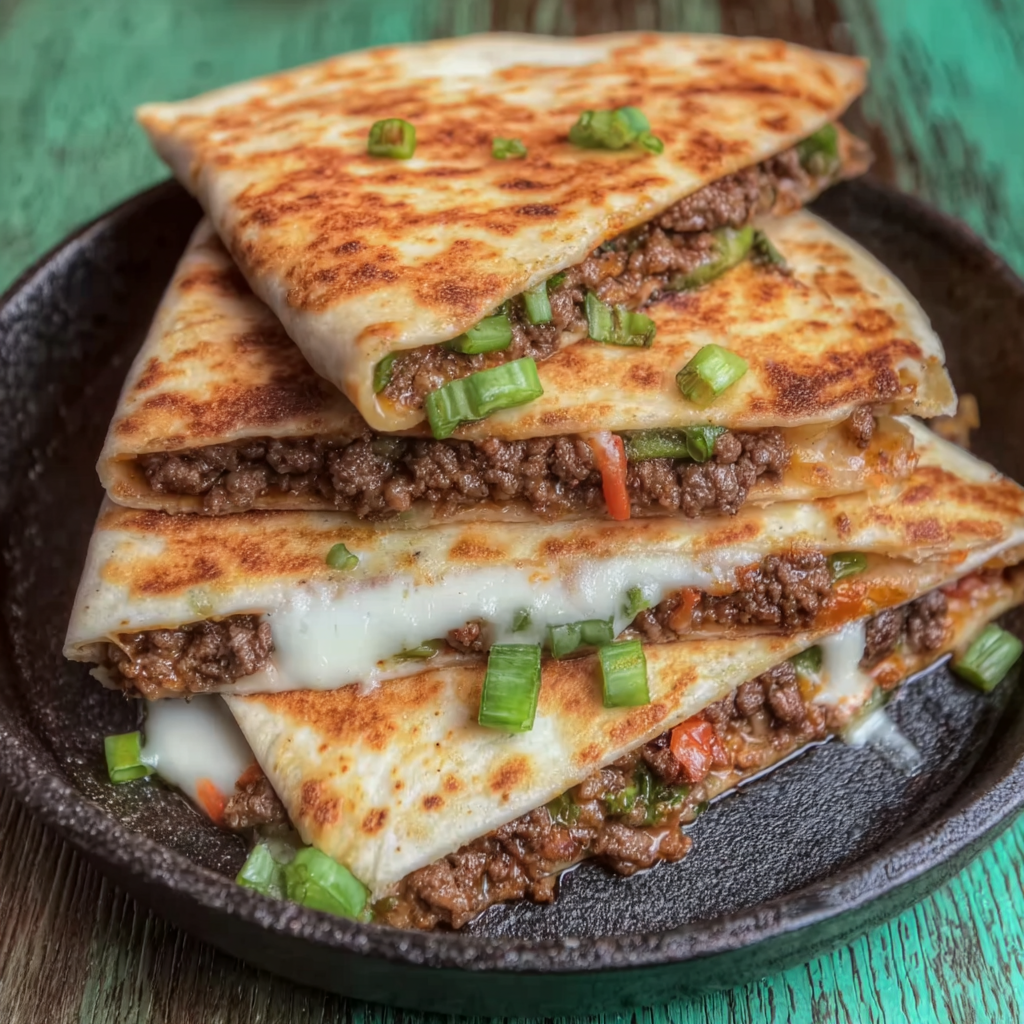
Korean Beef Quesadillas
Flour tortillas filled with sweet-savory Korean beef, melted mozzarella, and crisp green onions — a quick fusion comfort snack or light meal.
Pumpkin Swirl Brownies
Fudgy chocolate brownies swirled with a creamy spiced pumpkin layer — a perfect fall dessert that's rich, seasonal, and ready in under an hour.
Did You Make This?
Leave a comment & rating below or tag @royalrecipe on social media!
Rate This Recipe
Share This Recipe
Enjoyed this recipe? Share it with friends and family, and don't forget to leave a review!
Comments (1)
This recipe looks amazing! Can't wait to try it.
Comments are stored locally in your browser. Server comments are displayed alongside your local comments.

Hi, I'm Olivia!
What's Popular
30-Minute Meals!
Join to receive our email series which contains a round-up of some of our quick and easy family favorite recipes.